How To Effectively Install Plugins on WordPress.com 2026
Plugins are finally on all paid plans; no hacks, no upgrades, no ‘why is this missing?’ moments. Let’s start installing them.
Everything You Need to Know (In 60 Seconds)
Here’s the deal: if you’re on any paid WordPress.com plan (Personal, Premium, Business, or Commerce), you can install plugins on WordPress.com right now. The process takes about 30 seconds once you know where to click.
Go to Plugins → Add New in your dashboard, search for what you need, hit Install and Activate, and you’re done.
But knowing how to install plugins on WordPress.com is just the beginning.
This guide covers finding the right plugins, avoiding common mistakes, managing updates, and keeping your site fast while using multiple plugins.
Let’s dive in.
What Fueled This Guide
Recently, I was helping a client set up her wellness coaching site. She’d just upgraded to the Personal plan specifically to install plugins on WordPress.com, and she was excited to add a booking system.
“It should be in the Plugins menu,” I told her over our video call.
She clicked around. “I don’t see it.”
We spent 15 minutes troubleshooting before I realized the problem: she was looking at the old WordPress.com interface while I was describing the new one. The button she needed was right there, but labeled differently than what I’d told her.
That’s when I realized how confusing this process can be if you’re doing it for the first time. The interface isn’t complicated, but WordPress.com has different dashboard views depending on your settings, and instructions that work for one person might not match what someone else sees on their screen.
So I’m writing this guide to cover both interface styles, common problems, and the stuff nobody tells you until something breaks.
Start your WordPress.com site — now with plugins on every paid plan →
Before You Install Plugins on WordPress.com (Read This First)

Stop. Before you install a single plugin, check if WordPress.com already includes what you need.
Seriously.
I’ve watched people install contact form plugins when WordPress.com already includes contact forms on Business plans. I’ve seen users add analytics plugins when Jetpack Stats is built in.
What’s Already Included on WordPress.com
Every WordPress.com plan includes:
- Jetpack features (security, performance tools, stats)
- Akismet (spam protection that filters 99.99% of junk)
- Essential SEO tools
- Content Delivery Network (CDN) for faster loading
- SSL certificates (automatic HTTPS)
- Contact forms (on Business and higher plans)
If you need basic analytics, site stats, security scanning, or spam filtering, you already have it. Don’t install redundant plugins that duplicate built-in features.
Which Plan Do You Need?
You can only install plugins on WordPress.com with a paid plan:
- Personal Plan ($4/month): Access to 50,000+ free plugins, 6 GB storage
- Premium Plan ($8/month): Everything in Personal plus 13 GB storage, video uploads, premium themes
- Business Plan ($25/month): Everything in Premium plus 50 GB storage, advanced SEO, backups, staging sites, SFTP access
- Commerce Plan ($45/month): Everything in Business plus full ecommerce features, 0% transaction fees
If you’re on the free plan, you won’t see the Plugins menu. You’ll need to upgrade first.
Also Read: WordPress.com Plugins on All Plans: What Changed in 2026
How to Install Plugins on WordPress.com (Step-by-Step)
WordPress.com has two dashboard interfaces. I’ll show you both, so you’re covered regardless of which one you see.
Method 1: New WordPress.com Interface
This is what most users see starting in 2026.
Step 1: Access Your Dashboard

Log in to your WordPress.com site, and you’ll land on your dashboard.
Step 2: Navigate to Plugins
Look at the left sidebar. Click on Plugins.
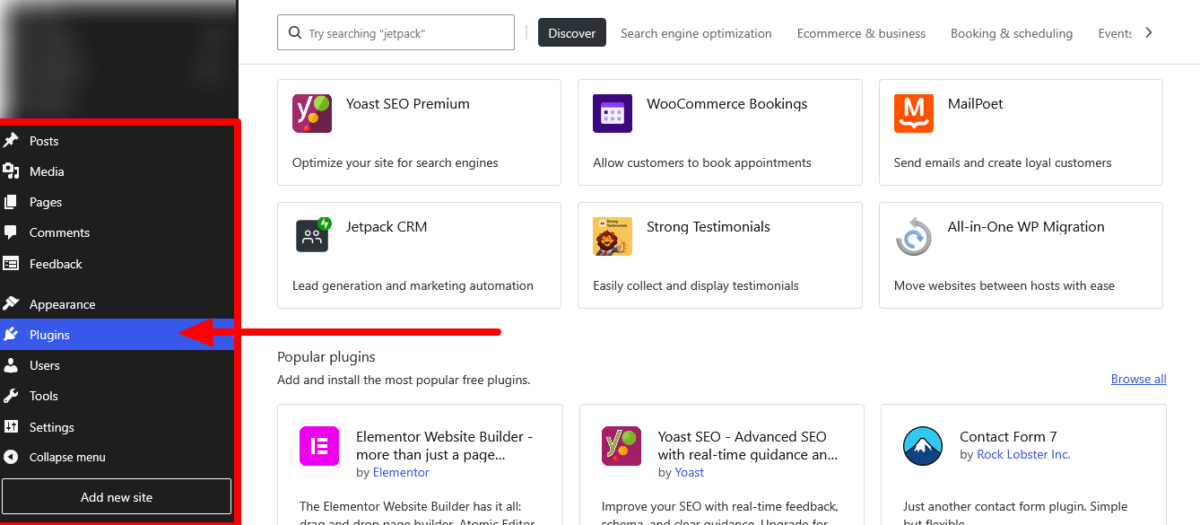
Step 3: Add New Plugin
Click the Add New button near the top of the screen.
Step 4: Search for a Plugin
You’ll see a search box at the top. Type what you’re looking for:
- Plugin name: “WPForms.”
- Feature: “contact form.”
- Category: “SEO”
Step 5: Review Plugin Details
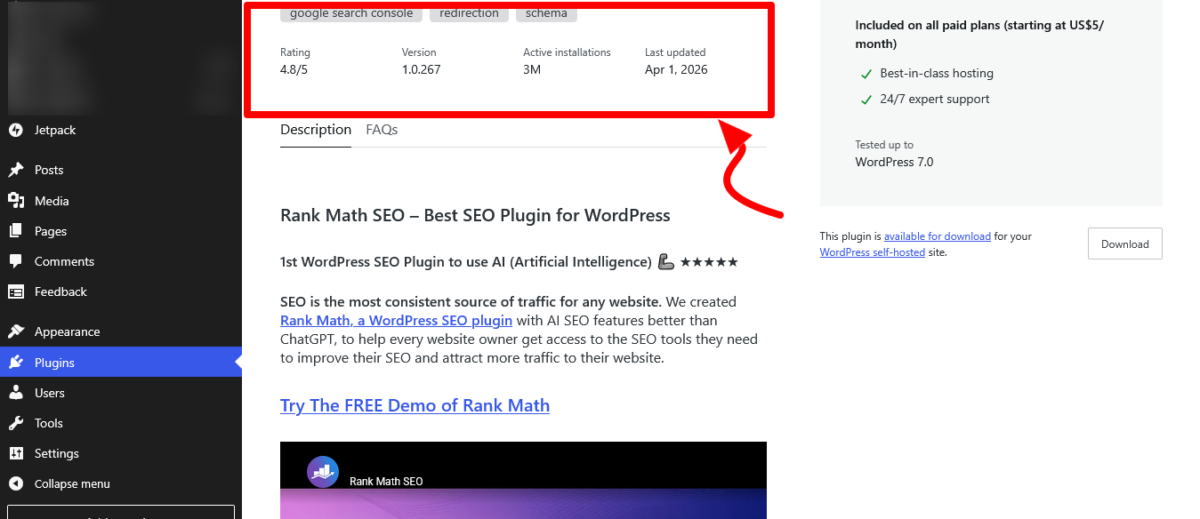
Click on any plugin name to read about it. Check:
- Star rating (4+ stars is good)
- Active installations (100,000+ means it’s popular and well-supported)
- Last updated (within the last few months means it’s actively maintained)
- Tested up to (should work with the latest WordPress version)
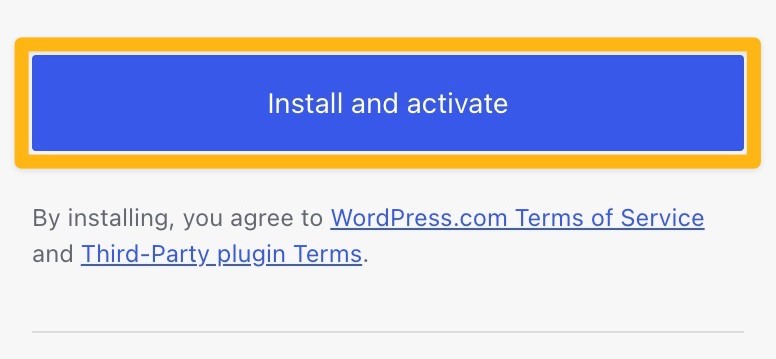
Step 6: Install and Activate
Found what you need? Click the Install and Activate button.
The plugin installs in seconds and activates automatically. You’re done.
Method 2: WP Admin Interface
Some users prefer the traditional WordPress admin interface.
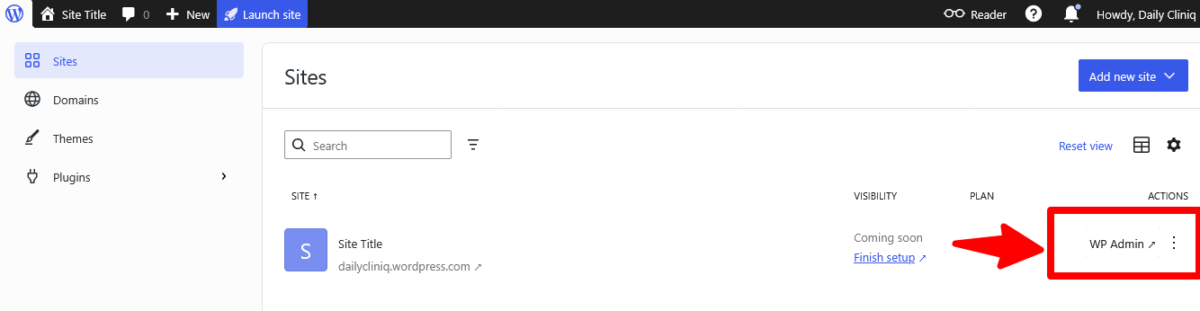
Step 1: Access WP Admin
From your main dashboard, click WP Admin in the top menu or sidebar.
Step 2: Go to Plugins
In the left sidebar, click Plugins → Add New Plugin.
Step 3: Search or Browse
Use the search box to find specific plugins, or browse:
- Featured (curated picks)
- Popular (most installed)
- Recommended (suggestions based on your site)
Step 4: View Plugin Information
Click on a plugin name to open its details. You’ll see tabs for:
- Description (what it does)
- Installation (any special requirements)
- FAQ (common questions)
- Reviews (what other users think)
- Screenshots (preview of how it looks)
Step 5: Install
Click Install Now. The button changes to Activate after a few seconds.
Step 6: Activate
Click Activate. The plugin is now live on your site.
How to Install Premium Plugins (Paid Plugins from Elsewhere)
Not all plugins are in the WordPress.com directory. Some developers sell premium plugins directly from their websites.
Here’s how to install plugins on WordPress.com when you have a ZIP file:
Step 1: Download the Plugin
Purchase and download the plugin from the developer’s website. It arrives as a .zip file. Don’t unzip it.
Step 2: Go to Plugins → Add New
In your WordPress.com dashboard, navigate to Plugins → Add New.
Step 3: Upload Plugin
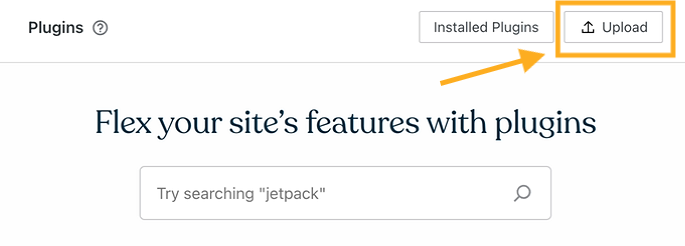
Look for the Upload Plugin button at the top. Click it.
Step 4: Choose File
Click Choose File, then select your .zip file from your computer.
Step 5: Install Now
Click Install Now. WordPress.com uploads and installs the plugin.
Step 6: Activate
Once installed, click Activate Plugin.
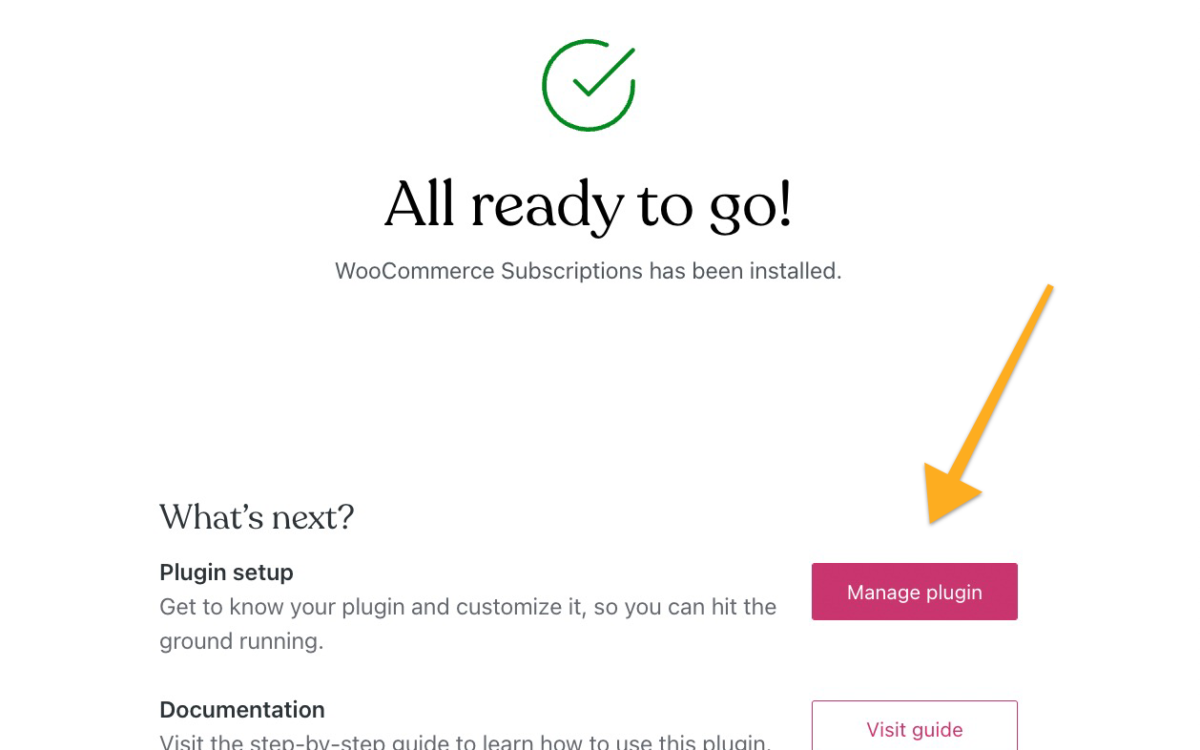
Done. Your premium plugin is ready to configure.
Common Premium Plugin Upload Mistakes
Mistake 1: Unzipping the file first
WordPress.com needs the .zip file intact. If you unzip it and try uploading individual folders, it won’t work.
Mistake 2: Uploading the wrong file
Some premium plugins come bundled with documentation, license files, or multiple plugin versions. Make sure you’re uploading the actual plugin .zip file, not a folder containing it.
Mistake 3: Exceeding file size limits
Very large plugin files (over 100 MB) might fail to upload through the dashboard. If this happens, you’ll need SFTP access (Business plan only) to upload manually.
Finding the Right Plugins to Install on WordPress.com
The WordPress.com Plugin Directory has over 50,000 options. Here’s how to find quality plugins without drowning in choices.
Start with Specific Needs
Don’t browse randomly. Know what you need:
- Contact forms
- SEO optimization
- Booking/scheduling
- Social media feeds
- Email capture
- Gallery/portfolio display
- Membership/courses
- Payment processing
Search for the feature, not just plugin names.
Evaluate Plugin Quality
Before you install plugins on WordPress.com, check these markers:
Active Installations
100,000+ = popular and reliable
10,000-100,000 = solid but smaller user base
Under 10,000 = newer or niche (check reviews carefully)
Last Updated
Within 3 months = actively maintained
3-6 months = probably fine, but monitor it
Over 6 months = potential red flag (might be abandoned)
Star Rating
4.5-5 stars = excellent
4-4.5 stars = good
Under 4 stars = read reviews to understand why
Compatibility
Make sure it says “Tested up to: WordPress 7.0” (or the latest version). WordPress.com always runs the newest WordPress version automatically.
Reviews Section
Read both positive and negative reviews. Look for:
- Mentions of good support from developers
- Complaints about bugs or conflicts
- Notes about performance impact
- Whether issues get resolved quickly
Trusted Plugin Recommendations
Based on actual testing, these plugins consistently perform well on WordPress.com:
Forms
WPForms Lite, Gravity Forms, Contact Form 7
SEO
Rank Math, Yoast SEO, AIOSEO
Security
Already built in via Jetpack, but iThemes Security adds extra layers on Business plans
Performance
WP Rocket (premium), Autoptimize, Imagify (image optimization)
Backup
UpdraftPlus (Personal/Premium plans), Jetpack Backup included on Business+
Booking/Scheduling
Amelia, Bookly, WP Simple Booking Calendar
E-commerce
WooCommerce (Commerce plan recommended)
Page Builders
Elementor, Beaver Builder
No more limitations — just WordPress.com and everything unlocked →
Configuring Plugins After Installation
Installing is easy. Configuring correctly? That’s where people mess up.
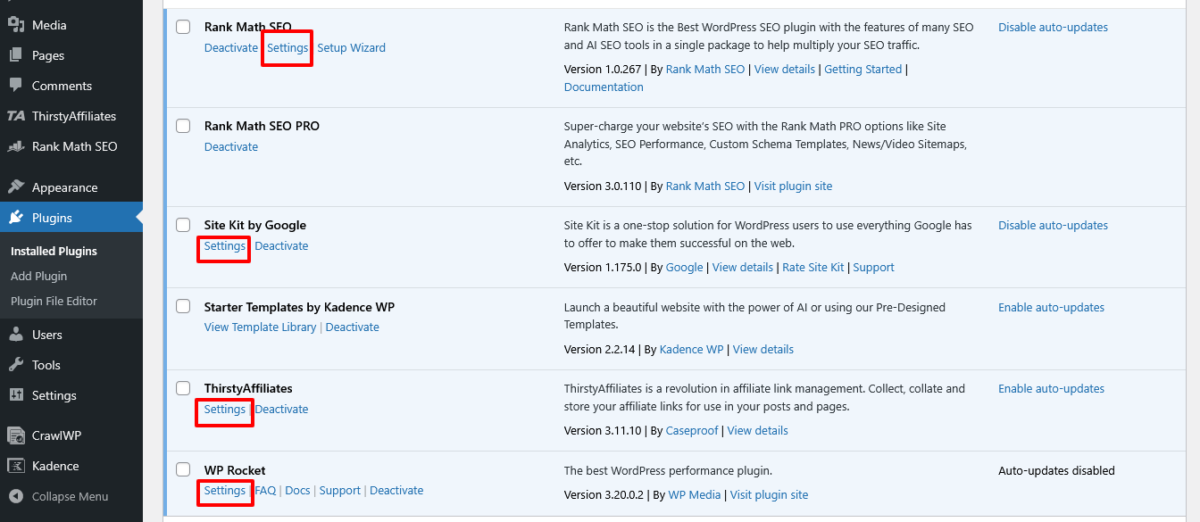
Finding Plugin Settings
After you install plugins on WordPress.com, look for settings in three places:
1. New Dashboard Menu Items
Many plugins add their own menu item in the left sidebar. WPForms adds “WPForms,” WooCommerce adds “WooCommerce,” etc.
2. Under Existing Menus
Some plugins nest their settings under:
- Settings → Plugin Name
- Tools → Plugin Name
- Appearance → Plugin Name
3. Editor/Block Options
Block-related plugins (galleries, forms, etc.) might not have separate settings pages. Instead, they add new blocks to the WordPress editor.
Read the Documentation
I know. Nobody likes reading manuals. But spending 10 minutes with a plugin’s documentation saves hours of frustration.
Good plugins include:
- Getting started guides
- Video tutorials
- FAQs
- Support forums
Check the plugin’s website or look for Settings, Docs, or Support links on your Installed Plugins page.
Test Before Going Live
If you’re adding a plugin to an existing site with traffic:
- Install and configure the plugin
- Test its functionality on a non-critical page
- Check your site speed (use GTmetrix or Google PageSpeed Insights)
- Browse your site like a visitor would
- Check the mobile display
If everything works smoothly, you’re good. If not, troubleshoot before the plugin goes live across your entire site.
Unlock 50,000+ plugins on WordPress.com and build your site your way →
Managing Multiple Plugins Without Breaking Your Site
Here’s the truth: plugins are powerful, but they’re also where most WordPress problems start.
How Many Plugins is Too Many?
There’s no magic number. I’ve seen sites with 50 plugins running perfectly and sites with 8 plugins that crawl.
It’s not about quantity; it’s about quality.
General Guidelines:
- Personal/small sites: 5-15 plugins
- Business sites: 15-25 plugins
- Complex sites (e-commerce, memberships): 25-40 plugins
Focus on well-coded, lightweight plugins that do one thing really well.
Avoiding Plugin Conflicts
Plugin conflicts happen when two plugins try to do similar things or modify the same parts of your site.
Symptoms of conflicts:
- White screen of death
- Features suddenly stop working
- Slow page loading
- Admin dashboard errors
How to prevent conflicts:
- Install one plugin at a time
Don’t install 10 plugins in one session. Add one, test it, then move to the next. - Check compatibility
Read plugin reviews for mentions of conflicts with popular plugins you already use. - Deactivate before deleting
Always deactivate a plugin before deleting it. Some plugins need to clean up their data properly.
How to fix conflicts:
- Deactivate all plugins
- Reactivate them one at a time
- Test your site after each activation
- The plugin that breaks your site is your culprit
Remove or replace the problematic plugin.
Keeping Plugins Updated
Outdated plugins are security risks. Hackers specifically target old plugin versions with known vulnerabilities.
How to update plugins:
Go to Plugins → Installed Plugins. You’ll see update notifications next to any plugin with a new version.
Click Update Now for each plugin that needs updating.
Should you enable automatic updates?
For most users on Personal/Premium plans: Yes. Automatic updates keep you secure without manual work.
For Business plan users with custom code or complex setups: Maybe. Test updates on staging sites first to avoid breaking live sites.
Before updating plugins:
- Back up your site (Business plans include automatic backups; Personal/Premium users should use UpdraftPlus)
- Check the plugin’s changelog to see what changed
- Update during low-traffic times
Manage and install plugins effortlessly on WordPress.com — full control, now on every paid plan →
Troubleshooting Common Plugin Installation Problems

“I don’t see the Plugins menu.”
Cause: You’re on the free plan.
Solution: Upgrade to any paid plan (Personal, Premium, Business, or Commerce) to install plugins on WordPress.com.
“The ‘Install and Activate button is grayed out.“
Cause: The plugin isn’t compatible with WordPress.com, or you don’t have permission.
Solution: Check if the plugin is on WordPress.com’s restricted list. Some plugins that modify core files or cause security/performance issues aren’t allowed.
“Plugin installed, but doesn’t appear anywher.e”
Cause: The plugin doesn’t have obvious settings, or they’re in an unexpected location.
Solution: Check under Settings, Tools, and Appearance menus. Try adding a new page and looking for new blocks in the editor.
“Upload failed: The uploaded file exceeds maximum.”
Cause: The plugin file is too large for upload through the dashboard.
Solution: If you’re on a Business plan, upload via SFTP. Otherwise, contact the plugin developer for a lighter version or alternative.
“Site broke after installing the plugin.”
Cause: Plugin conflict or incompatibility.
Solution:
- Deactivate the newly installed plugin immediately
- If you can’t access your dashboard, contact WordPress.com support
- On Business plans, use SFTP to manually remove the plugin folder from
/wp-content/plugins/
“Plugin installed, but the feature isn’t working.“
Cause: Plugin needs configuration, or there’s a conflict.
Solution: Check the plugin’s settings and documentation. Make sure you’ve completed all setup steps. Try deactivating other plugins temporarily to test for conflicts.
Create a powerful site on WordPress.com — without the usual limits →
Best Practices for Installing Plugins on WordPress.com
1. Start with Built-in Features
Before you install plugins on WordPress.com, check if Jetpack or built-in features already handle what you need.
2. Install Only What You Really Need
Every plugin adds code to your site. More code = more potential for slowdowns and conflicts.
Ask yourself: “Will this plugin solve a real problem for my visitors or business?”
If the answer is no, skip it.
3. Favor Popular, Well-Maintained Plugins
Popular plugins have:
- Active support forums
- Regular updates
- Extensive documentation
- Large user bases that catch bugs quickly
4. Check Performance Impact
After installing any plugin:
- Test your site speed
- Check mobile performance
- Browse your site like a visitor
If a plugin slows things down significantly, look for lighter alternatives.
5. Delete Unused Plugins Completely
Don’t just deactivate plugins you’re not using—delete them.
Inactive plugins still exist on your server and can create security vulnerabilities.
6. Read Reviews for Red Flags
Look for phrases like:
- “Conflicts with…”
- “Slowed my site down…”
- “Developer doesn’t respond…”
- “Stopped working after update…”
These are warnings. Heed them.
7. Keep a Plugin List
Maintain a simple document listing:
- Which plugins are you using
- What each one does
- Why did you install it
This helps when troubleshooting or migrating to a new site.
If you’ve been waiting for plugins… this is your moment →
What to Do When Things Go Wrong
Plugin Broke Your Site
Immediate steps:
- Don’t panic
- Try accessing your dashboard and deactivating the plugin
- If you can’t access the dashboard, contact WordPress.com support
- Business plan users: Use SFTP to delete the plugin folder
Plugin Conflicts
Symptoms:
- Features stop working
- Error messages
- Slow performance
- White screen
Fix:
- Deactivate all plugins
- Reactivate one at a time
- Test after each activation
- Identify which combination causes problems
- Choose which plugin to keep or find alternatives
Plugin Slowing Down Your Site
Diagnosis:
Use the Query Monitor plugin (yes, a plugin to monitor plugins) or GTmetrix to see which plugins are consuming resources.
Solution:
Replace resource-heavy plugins with lighter alternatives, or remove non-essential plugins entirely.
Build a real website on WordPress.com — fast, flexible, yours →
Recommended Plugin Combinations for Different Sites
For Bloggers (Personal Plan)
- Rank Math (SEO)
- WPForms Lite (contact forms)
- Social Warfare (social sharing)
- UpdraftPlus (backups)
- Imagify (image optimization)
For Small Business Sites (Premium Plan)
- Rank Math (SEO)
- WPForms Pro (advanced forms)
- Elementor (page builder)
- WP Google Maps (location display)
- MonsterInsights Lite (Google Analytics integration)
For Membership/Course Sites (Business Plan)
- MemberPress (memberships)
- LifterLMS (learning management)
- WPForms Pro (registration forms)
- Rank Math Pro (advanced SEO)
- WP Fusion (marketing automation)
For E-commerce (Commerce Plan)
- WooCommerce (already optimized for Commerce plans)
- Stripe/PayPal payment gateways
- Mailchimp for WooCommerce
- WooCommerce Product Addons
- YITH WooCommerce Wishlist
Future-Proofing Your Plugin Strategy
Technology changes. Plugins get abandoned. Here’s how to stay ahead:
1. Monitor Plugin Activity
Check your Installed Plugins page monthly. Look for:
- Plugins that haven’t updated in 6+ months
- Plugins with new security vulnerabilities
- Plugins that no longer match your needs
2. Stay Informed About Alternatives
WordPress evolves. Sometimes, core WordPress adds features that replace plugin functionality.
For example, WordPress now includes native block patterns and full-site editing that replace some page builder functions.
3. Plan for Plugin Deprecation
Popular plugins sometimes get discontinued. Have backup options in mind for critical plugins.
4. Keep Learning
Follow WordPress.com’s blog for announcements about new built-in features that might replace plugins you’re using.
Your Next Steps
You now know how to install plugins on WordPress.com. But knowledge without action is just entertainment.
Here’s what to do right now:
If you’re on a paid plan:
Go to your dashboard, navigate to Plugins, and explore what’s available. Even if you don’t install anything today, familiarize yourself with the interface.
If you’re on the free plan:
Decide if you need plugin functionality. If yes, upgrade to Personal. If no, you’re good where you are.
If you’re stuck:
WordPress.com has excellent support. Use the help center or contact support directly. They’re genuinely helpful, not just copy-paste robots.
The ability to install plugins on WordPress.com transforms what you can build. You’re not limited anymore. You have access to the same tools professional developers use.
What you build with them is entirely up to you.
FAQs
Can I install plugins on WordPress.com for free?
No.
You need a paid plan (Personal, Premium, Business, or Commerce) to install plugins on WordPress.com. The free plan doesn’t include plugin access.
How many plugins can I install on WordPress.com?
There’s no hard limit on the number of plugins you can install.
However, keep it reasonable, focus on quality over quantity. Most sites function well with 10-25 plugins, depending on complexity.
What’s the difference between free and premium plugins?
Free plugins are available in the WordPress.com Plugin Directory at no cost. Premium (paid) plugins are purchased from developers’ websites and often include advanced features, priority support, and regular updates.
Both types can be installed on WordPress.com paid plans.
Can I install any WordPress plugin on WordPress.com?
Most plugins work on WordPress.com, but some are restricted due to security or performance concerns.
Plugins that modify core WordPress files, cause conflicts with WordPress.com infrastructure, or present security risks aren’t allowed. Check the plugin directory for compatibility.
How do I install a plugin from a ZIP file on WordPress.com?
Go to Plugins → Add New → Upload Plugin, choose your ZIP file, click Install Now, then Activate.
Make sure you don’t unzip the file first—WordPress.com needs the intact ZIP file.
Will installing plugins slow down my WordPress.com site?
It depends on the plugins. Well-coded, lightweight plugins have minimal impact. Poorly coded or resource-heavy plugins can slow your site significantly.
Test your site speed after installing new plugins and remove any that cause performance issues.
How do I update plugins on WordPress.com?
Go to Plugins → Installed Plugins. You’ll see update notifications next to plugins with new versions. Click “Update Now” for each plugin.
You can also enable automatic updates for trusted plugins.
What should I do if a plugin breaks my WordPress.com site?
Immediately deactivate the plugin through your dashboard. If you can’t access your dashboard, contact WordPress.com support. Business plan users can use SFTP to manually delete the plugin folder from the server.
Can I install plugins on WordPress.com with the Personal plan?
Yes!
The Personal plan ($4/month) includes access to install plugins on WordPress.com. You get access to 50,000+ free plugins from the WordPress Plugin Directory, plus the ability to upload premium plugins.
How do I know if a plugin is safe to install on WordPress.com?
Check the plugin’s star rating (4+ stars is good), active installations (100,000+ indicates popularity), last update date (within 3 months is ideal), and read reviews.
Avoid plugins that haven’t been updated in 6+ months or have numerous negative reviews mentioning security issues.
Do I need to install Jetpack separately on WordPress.com?
No.
Jetpack features are built into all WordPress.com plans. You don’t need to install Jetpack as a separate plugin—the essential features are already active on your site.
Can I install WooCommerce on a WordPress.com Personal plan?
Technically, yes, but it’s not recommended. WooCommerce works best on the Commerce plan, which includes 0% transaction fees and ecommerce-specific features. Personal and Premium plans have transaction fees that make selling products expensive.
Quick note: Some links here are affiliate links. If you decide to try WordPress.com through them, we may earn a small commission — at no extra cost to you.